Setting Up X POS
Before you can start using X POS, you need to configure your POS Profile in ERPNext and set up the application. This page covers the complete setup process.
Prerequisites
Before setting up X POS, ensure you have:
- ERPNext Instance — A running ERPNext site with the X POS app installed
- Company — At least one Company set up in ERPNext
- Warehouse — A warehouse configured for your POS location
- Items — Products/items added to the Item master with selling prices
- Customer — At least one default customer (e.g., "Walk-in Customer")
- Payment Modes — Mode of Payment entries (Cash, Card, etc.) configured in ERPNext
POS Profile Configuration
The POS Profile is the central configuration document that controls almost every aspect of X POS behavior. Navigate to POS Profile in your ERPNext instance to create or edit one.
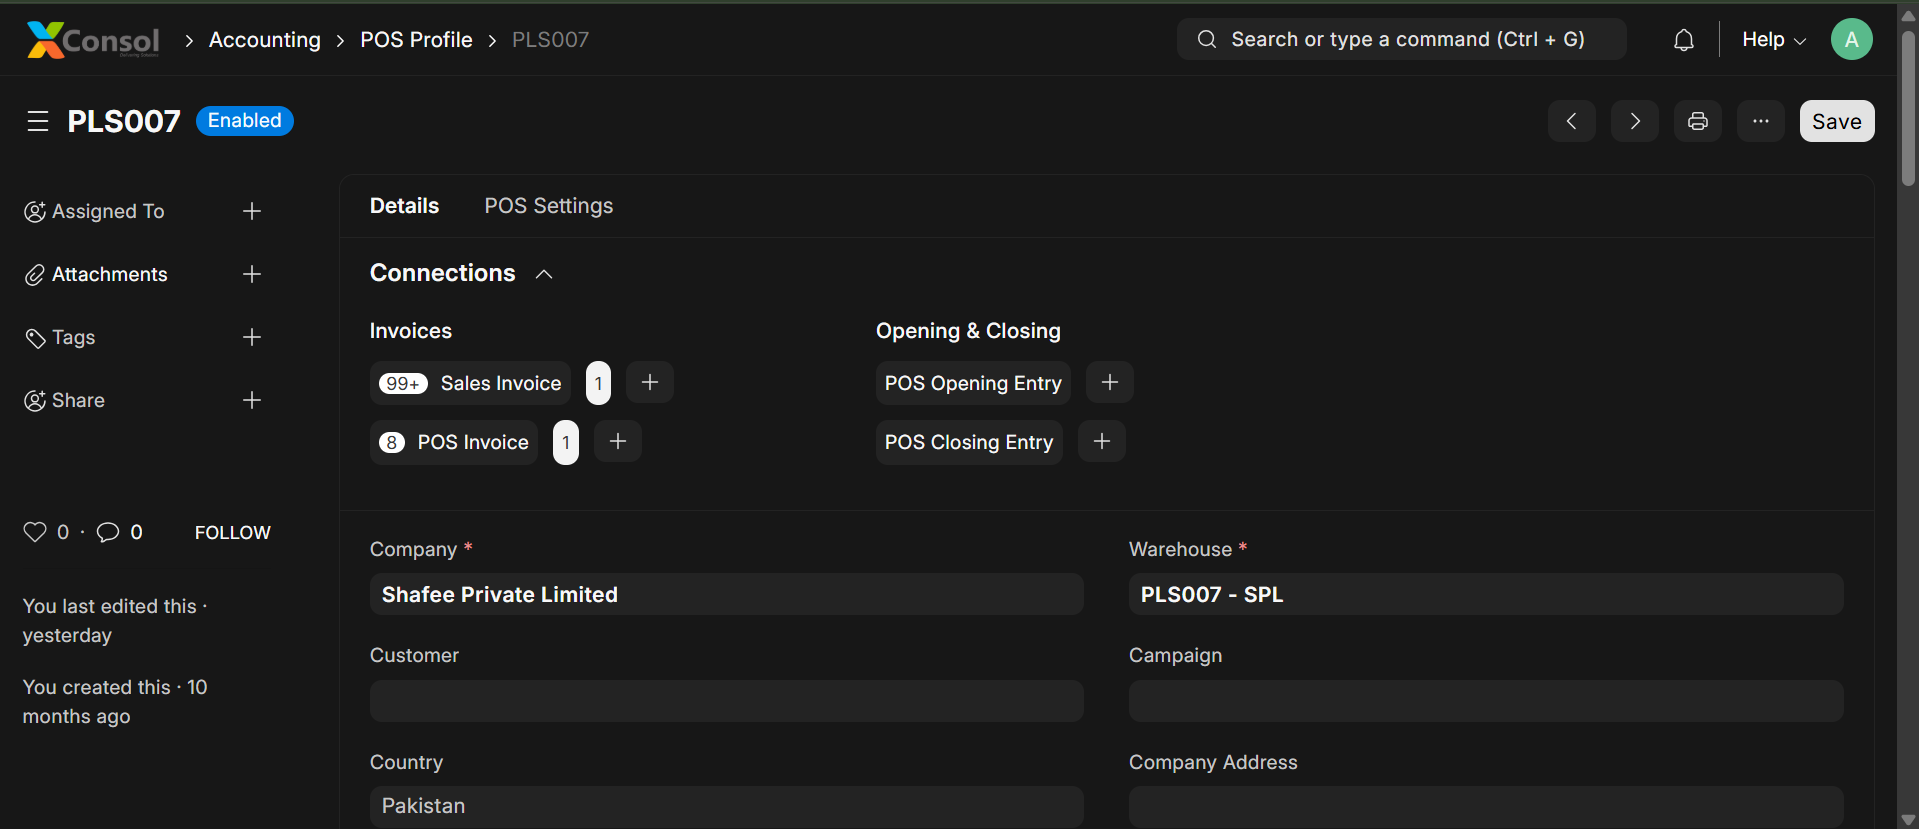
Basic Settings
| Field | Description |
|---|---|
| Company | The company this POS profile belongs to |
| Warehouse | Default warehouse for stock deductions |
| Currency | Operating currency for this POS terminal |
| Selling Price List | Price list used for item pricing |
| Write Off Account | Account for small balance write-offs |
| Write Off Cost Center | Cost center for write-offs |
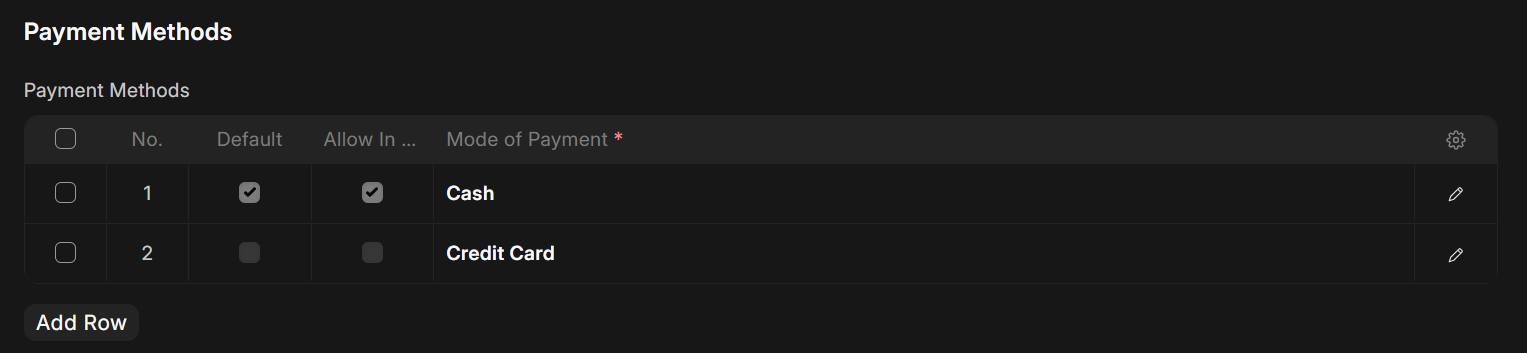
Payment Methods
Add one or more payment methods (modes of payment) that this POS terminal accepts. Each payment method can have:
- Mode of Payment — e.g., Cash, Credit Card, Debit Card, Bank Transfer, Mobile Money
- Default — Whether this is the default selected method
- Allow in Returns — Whether this method can be used for refund payments
Customer Settings
| Field | Description |
|---|---|
| Customer | Default customer for walk-in sales (auto-selected when creating new transactions) |
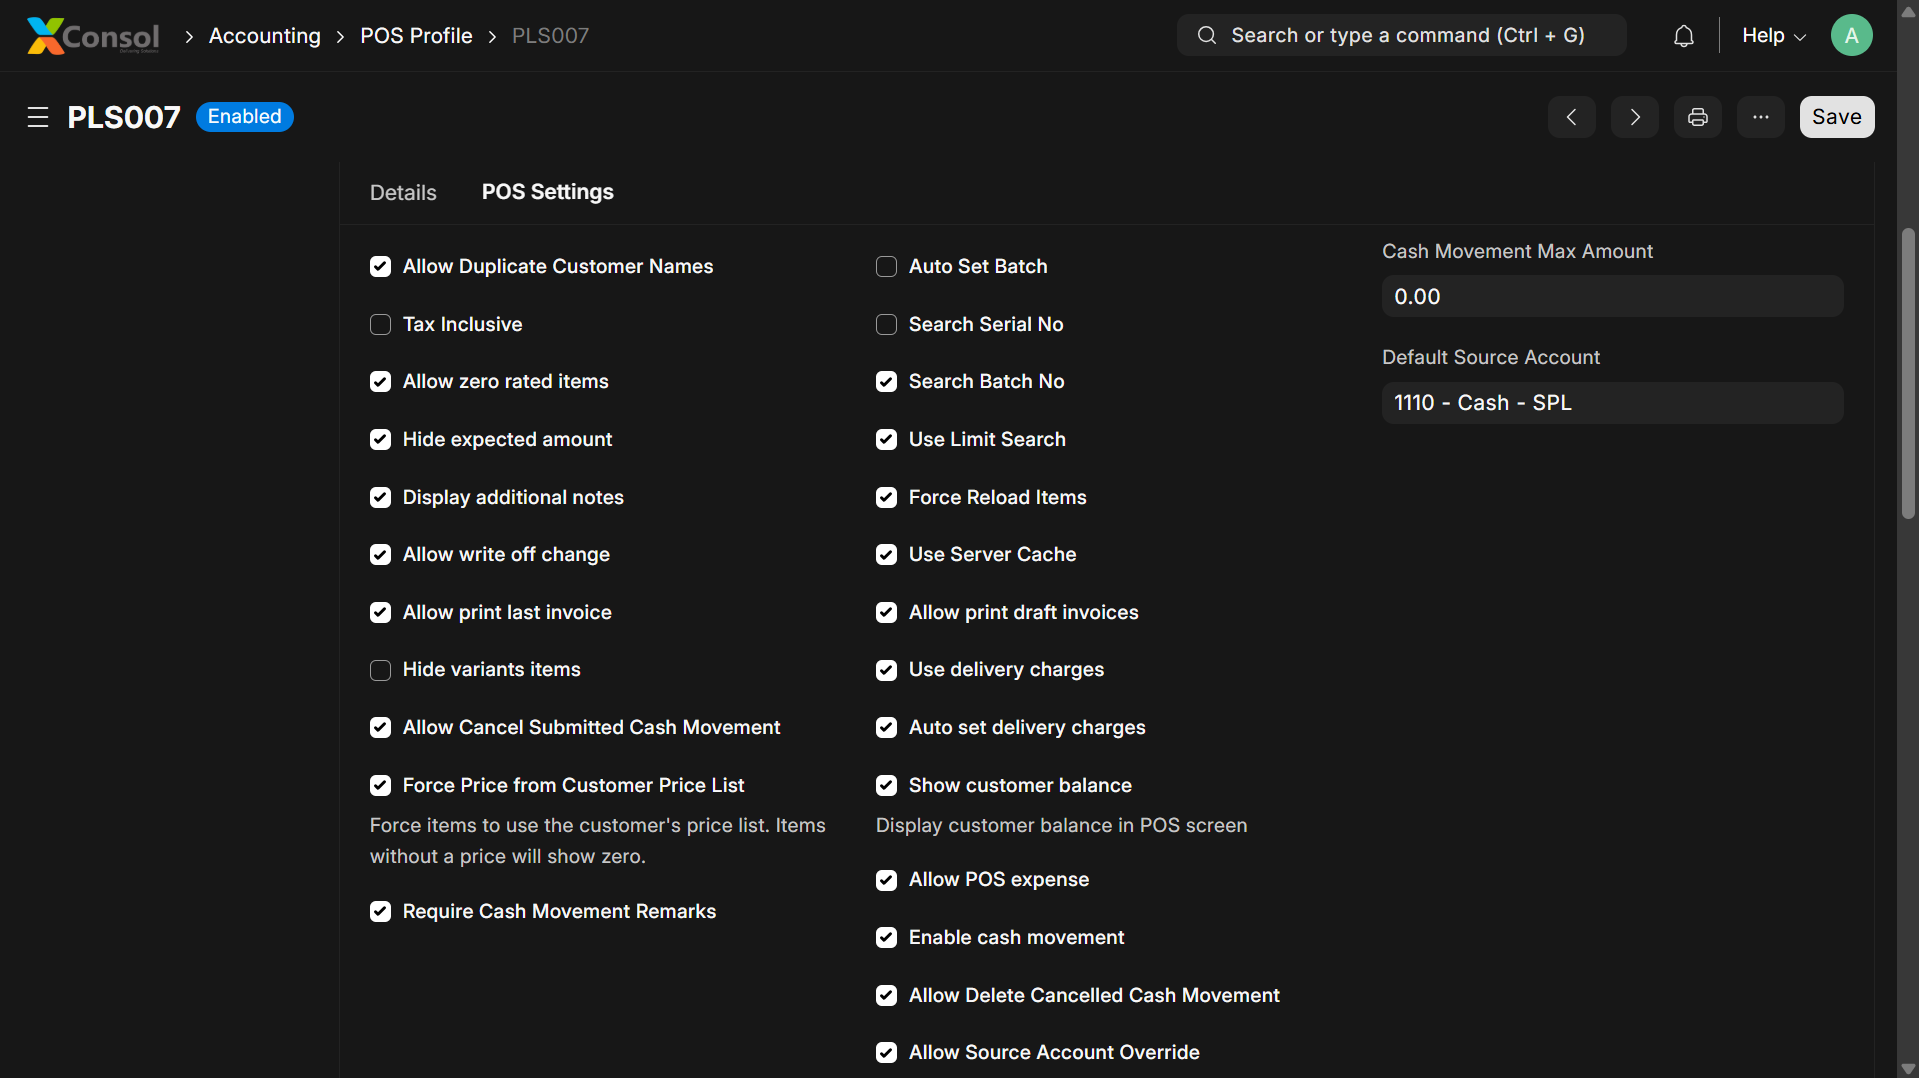
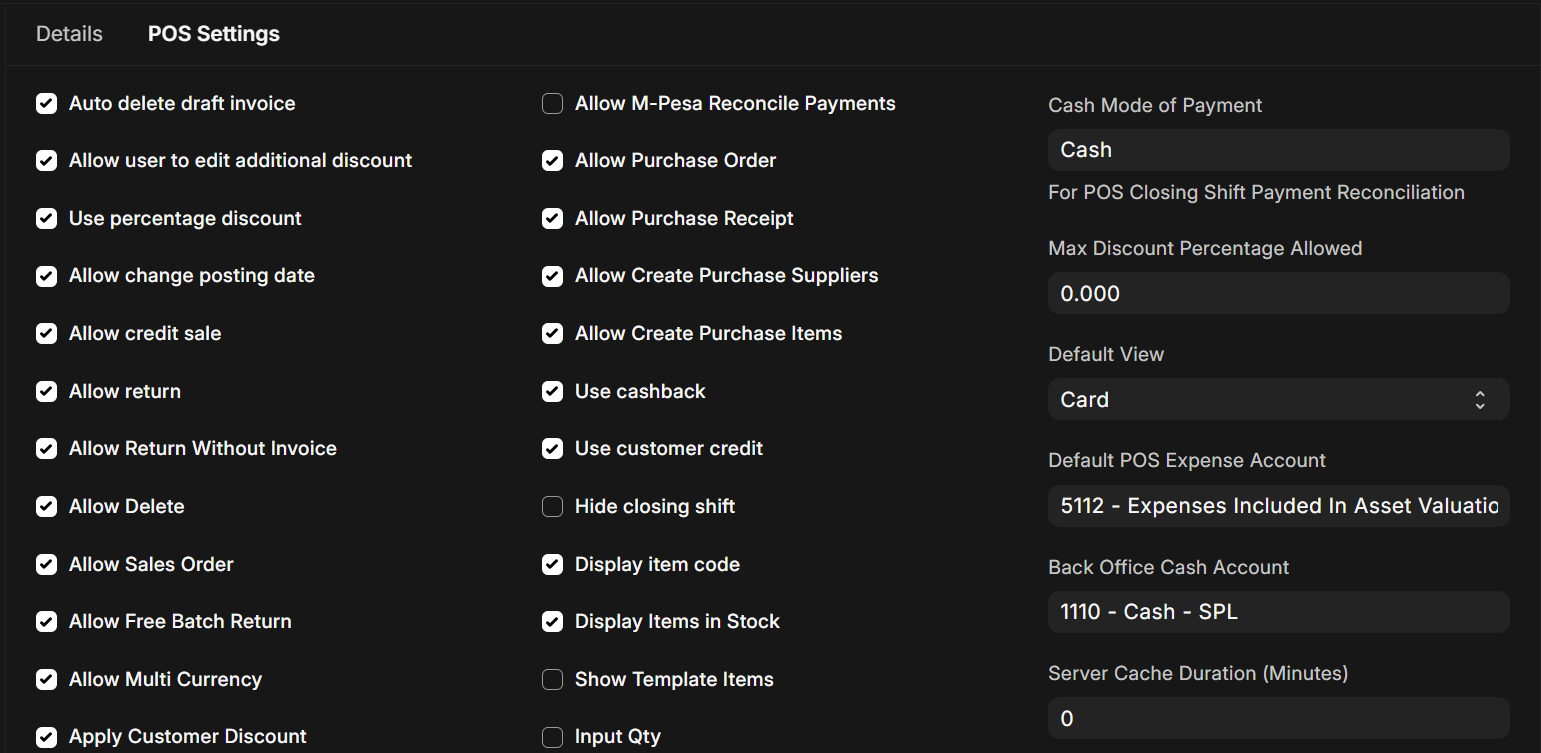
X POS Feature Flags (POS Profile Custom Fields)
X POS adds extensive custom fields to the POS Profile doctype. These fields act as feature flags that control which features are visible and enabled in the POS interface.
Item Display Settings
| Setting | Type | Default | Description |
|---|---|---|---|
| Default View | Select | Card | Default item display mode — "Card" (grid with images) or "List" (compact table rows) |
| Display Item Code | Check | Off | Show item code below the item name in the POS |
| Display Items in Stock | Check | Off | Show stock quantity badge on each item card |
| Hide Images | Check | Off | Hide item images and show icon placeholders instead |
| Hide Unavailable Items | Check | Off | Completely hide items with zero stock |
| Block Sale Beyond Available Qty | Check | Off | Prevent adding items to cart when stock is insufficient |
| Hide Variants Items | Check | Off | Skip the variant selection dialog and add items directly |
| Show Template Items | Check | Off | Show template (parent) items in the item grid |
| Search Serial No | Check | Off | Enable searching items by serial number |
| Search Batch No | Check | Off | Enable searching items by batch number |
| Auto Set Batch | Check | Off | Automatically select the first available batch when adding items |
| Input Qty | Check | Off | Show a quantity input dialog before adding items to cart |
| Fetch Items Directly From Server | Check | Off | Always fetch item data from server instead of using local cache |
| Item Search Limit | Int | 20 | Number of items to display per page in the item grid |
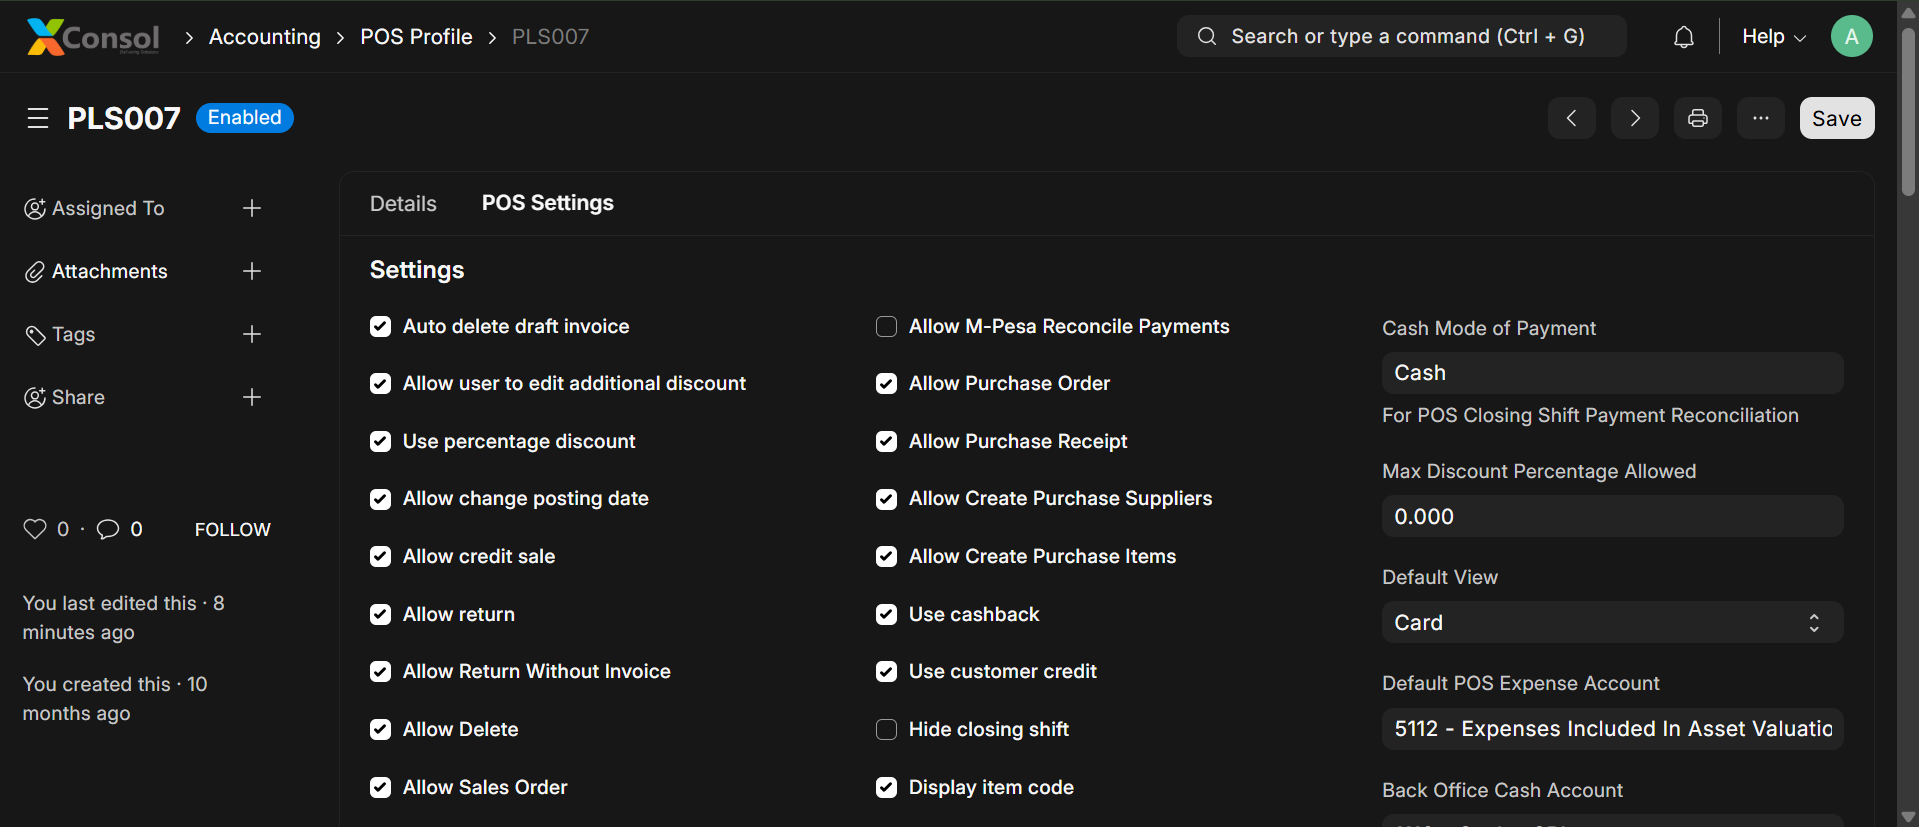
Pricing & Discount Settings
| Setting | Type | Default | Description |
|---|---|---|---|
| Allow Rate Change | Check | Off | Allow cashiers to edit the item selling rate |
| Allow Discount Change | Check | Off | Allow cashiers to apply line-item discounts |
| Allow User to Edit Additional Discount | Check | Off | Allow applying an overall invoice discount |
| Max Discount Percentage Allowed | Percent | 0 | Maximum discount percentage a cashier can apply (0 = unlimited) |
| Display Discount | Select | Percentage | Show discount input as "Percentage" or "Amount" |
| Use Percentage Discount | Check | Off | Default to percentage-based discounts |
| Apply Customer Discount | Check | Off | Automatically apply customer group pricing discounts |
| Force Price From Customer Price List | Check | Off | Override standard price list with customer-specific pricing |
| Allow Zero Rated Items | Check | Off | Allow items with a zero selling price |
| Tax Inclusive | Check | Off | Show tax-inclusive prices on the receipt |
| Disable Rounded Total | Check | Off | Disable automatic rounding of the grand total |
Payment & Credit Settings
| Setting | Type | Default | Description |
|---|---|---|---|
| Allow Credit Sale | Check | Off | Allow sales on credit (customer account) without full payment |
| Allow Partial Payment | Check | Off | Allow checkout with partial payment |
| Allow Write Off Change | Check | Off | Allow writing off small remaining amounts |
| Hide Expected Amount | Check | Off | Hide the expected payment amount in the closing dialog |
Return Settings
| Setting | Type | Default | Description |
|---|---|---|---|
| Allow Return | Check | Off | Enable the return/refund workflow |
| Allow Return Without Invoice | Check | Off | Allow processing returns without referencing an original invoice |
| Enable Return Validity | Check | Off | Enforce a time limit on returns |
| Return Validity Days | Int | 0 | Number of days after purchase within which returns are accepted |
| Allow Free Batch Return | Check | Off | Allow returns without specifying the original batch |
Cash Management Settings
| Setting | Type | Default | Description |
|---|---|---|---|
| Enable Cash Movement | Check | On | Enable cash-in and cash-out tracking during shifts |
| Allow POS Expense | Check | On | Allow recording cash expenses from the register |
| Allow Cash Deposit | Check | On | Allow recording cash deposits/bank drops |
| Require Cash Movement Remarks | Check | Off | Require a reason/note for every cash movement |
| Allow Cancel Submitted Cash Movement | Check | Off | Allow cancellation of submitted cash movements |
| Allow Delete Cancelled Cash Movement | Check | Off | Allow permanent deletion of cancelled movements |
| Allow Source Account Override | Check | Off | Allow changing the source account for cash movements |
| Cash Mode of Payment | Link | Mode of payment used for shift reconciliation | |
| Default POS Expense Account | Link | Default account for POS cash expenses | |
| Back Office Cash Account | Link | Account for back-office cash reconciliation | |
| Cash Movement Max Amount | Currency | Maximum amount allowed per cash movement |
Printing Settings
| Setting | Type | Default | Description |
|---|---|---|---|
| Default Print Format | Link | XPOS Thermal Receipt | Print format used for receipts |
| Allow Print Last Invoice | Check | Off | Show "Print Last Receipt" button in the navbar |
| Allow Print Draft Invoices | Check | Off | Allow printing invoices before submission |
| Print Format Rules | Table | Rules for selecting different print formats based on conditions |
Purchase & Procurement Settings
| Setting | Type | Default | Description |
|---|---|---|---|
| Allow Purchase Order | Check | Off | Enable the purchase order module |
| Allow Purchase Receipt | Check | Off | Enable stock receiving |
| Allow Create Purchase Suppliers | Check | Off | Allow creating new suppliers inline |
| Allow Create Purchase Items | Check | Off | Allow creating new items inline |
Advanced Settings
| Setting | Type | Default | Description |
|---|---|---|---|
| Display Additional Notes | Check | Off | Show a notes field on cart items and order notes |
| Allow Change Posting Date | Check | Off | Allow backdating invoices |
| Allow Multi Currency | Check | Off | Support foreign currency transactions |
| Allow Sales Order | Check | Off | Enable sales order creation from POS |
| Allow Submissions in Background Job | Check | Off | Queue invoice submissions as background jobs |
| Auto Delete Draft Invoice | Check | Off | Automatically clear draft when starting a new sale |
| Create POS Invoice Instead of Sales Invoice | Check | Off | Use POS Invoice doctype instead of Sales Invoice |
| Show Customer Balance | Check | Off | Display customer outstanding balance |
| Allow Duplicate Customer Names | Check | Off | Allow creating customers with duplicate names |
| Auto Create Referral for New Customers | Check | Off | Generate referral codes for new customers |
| Hide Closing Shift | Check | Off | Hide the close shift button from the navbar |
Offline & Sync Settings
| Setting | Type | Default | Description |
|---|---|---|---|
| Use Offline Mode | Check | Off | Enable offline data caching and sync |
| Allow Delete Offline Invoice | Check | Off | Allow deleting unsynced offline invoices |
| Server Cache Duration | Int | Duration in minutes to cache server data |
Offer & Coupon Settings
| Setting | Type | Default | Description |
|---|---|---|---|
| Auto Fetch Coupons/Gifts | Check | Off | Automatically fetch and apply eligible coupons and gift offers |
| Use Delivery Charges | Check | Off | Enable delivery charge selection |
| Auto Set Delivery Charges | Check | Off | Automatically apply default delivery charges |
Allowed Accounts Tables
| Table | Description |
|---|---|
| Allowed Source Accounts | Bank/cash accounts that can be used as source for cash movements |
| Allowed Expense Accounts | Expense accounts available for POS expense entries |
| Allowed Sales Persons | Sales persons that can be assigned to transactions (filters who appears in dropdown) |
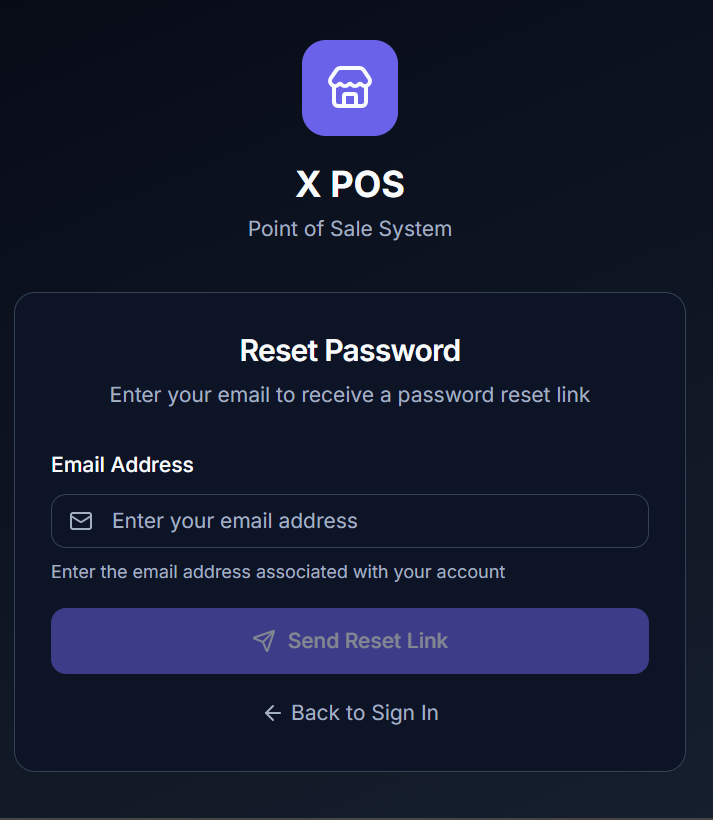
Password Reset
If you forget your password:
Click "Forgot Password?" on the login page
Enter your registered email address
Click "Send Reset Link"
Check your email for the reset instructions
After resetting, return to the login page
Opening a Shift
Before you can process any transactions, you must open a POS Shift. This is a standard POS workflow that tracks all transactions and cash movements during your working session.
When you log in and no shift is open, the Opening Shift Dialog automatically appears.
How to Open a Shift
- Select POS Profile — Choose from the dropdown (if only one profile is available, it's auto-selected)
- Review Company — The company is automatically filled based on the selected profile
- Enter Opening Balances — For each payment method (Cash, Card, etc.), enter the opening cash amount in the register
- Click "Open Shift"
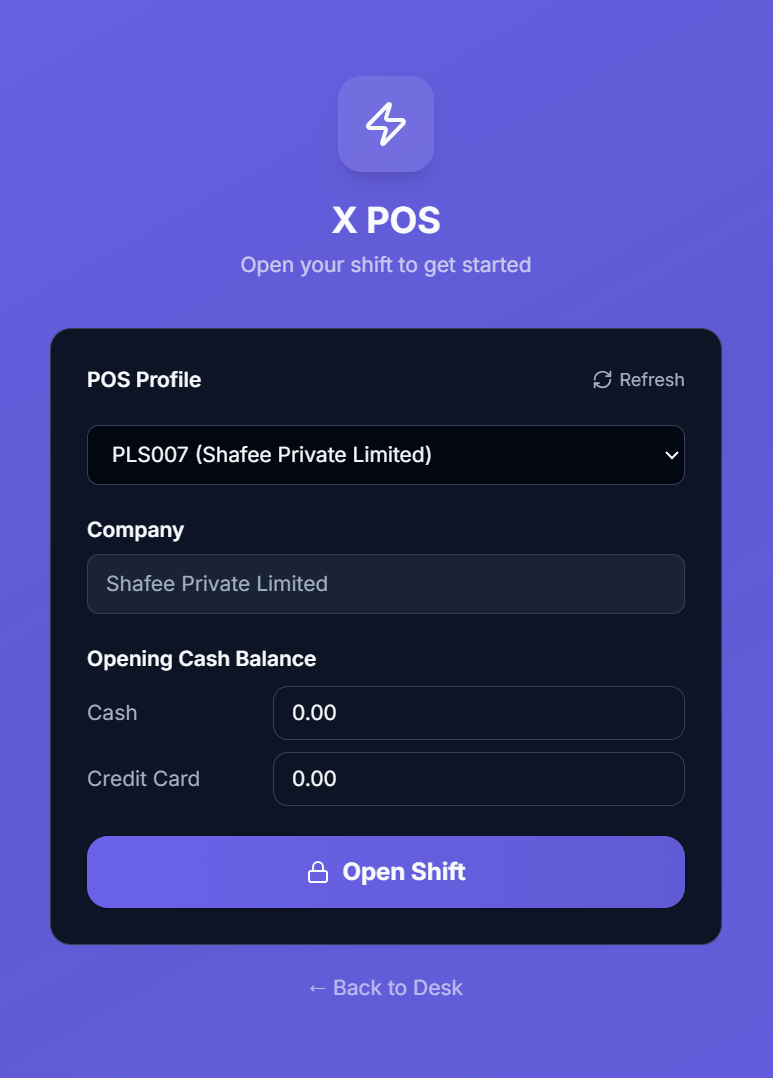
Important Notes
- Only one shift can be open per user at a time
- The opening balance should reflect the actual cash in the register drawer
- Card and other non-cash methods typically start at 0
- The "Back to Desk" link (web mode only) returns to the ERPNext desk without opening a shift