Customer Management & Loyalty Programs
X POS provides built-in customer management with search, creation, editing, and a complete loyalty program integration.
Customer Selection
Every transaction in X POS is associated with a customer. If a Default Customer is set in the POS Profile (e.g., "Walk-in Customer"), it's automatically selected for new transactions.
Searching Customers
- Click the customer area in the cart header, or press F6
- The Customer Selection Dialog opens
- Type in the search box — searches across customer name, phone number, and email
- Results appear in real-time (300ms debounce)
- Each result shows:
- Avatar — Customer initials or photo
- Name — Customer name
- Phone — Mobile number
- Email — Email address
- Use ↑/↓ arrow keys to navigate results
- Press Enter or click to select
Offline Customer Search
In Electron/offline mode:
- Customer data is pre-cached in the local database
- Search works against the local cache
- If the local search fails, it falls back to the server (if online)
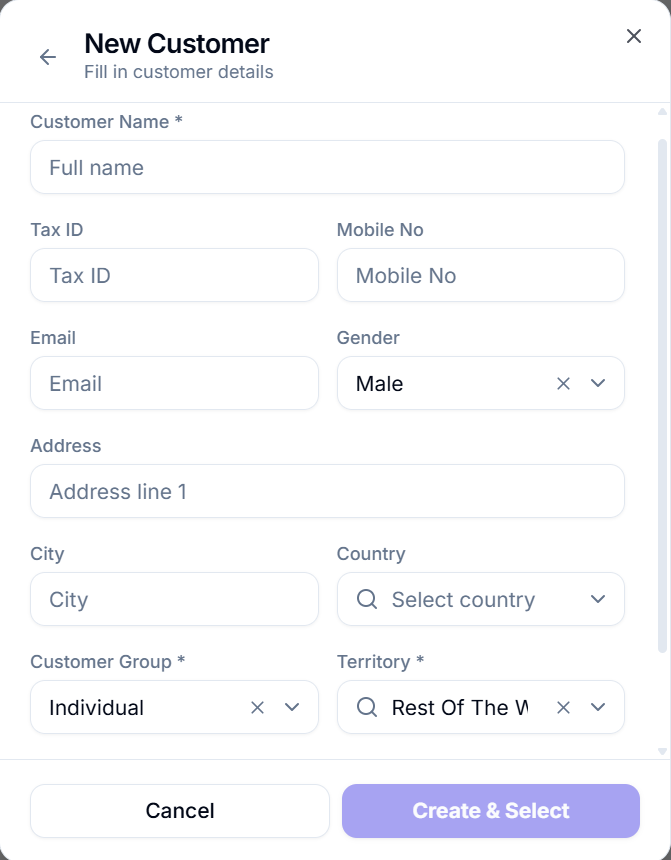
Creating New Customers
Inline Creation (From POS)
- Open the Customer Selection Dialog (F6)
- Click "Create New"
- Fill in the customer form:
| Field | Required | Description |
|---|---|---|
| Customer Name | ✅ Yes | Full name of the customer |
| Tax ID | No | National/tax identification number |
| Mobile Number | No | Contact phone number |
| Email Address | No | Email for digital receipts |
| Address | No | Street address |
| City | No | City |
| Country | No | Country (searchable dropdown) |
| Customer Group | ✅ Yes | Classification group (e.g., "Individual", "Corporate") |
| Territory | ✅ Yes | Geographic territory (e.g., "All Territories") |
| Referral Code | No | Referral tracking code |
| Birthday | No | Date of birth |
| Gender | No | Gender selection |
- The "Create & Select" button is enabled when all required fields (Name, Group, Territory) are filled
- Click "Create & Select" to create the customer and immediately set them for the current transaction
Dropdown Data
The Customer Group, Territory, and Country dropdowns are:
- Loaded from the server on first use
- Cached locally for faster subsequent access
- Available offline in Electron mode
Auto Referral Code
If "Auto Create Referral for New Customers" is enabled in POS Profile, a referral code is automatically generated when creating a new customer.
Customer Information
After selecting a customer, the system fetches and displays:
- Customer Name and avatar in the cart header
- Customer Balance — Outstanding balance (if "Show Customer Balance" is enabled)
- Credit Limit — Available credit limit
- Loyalty Information — Enrolled program, points balance
Clicking the customer avatar or edit icon opens additional customer details.
Loyalty Programs
X POS integrates with ERPNext's Loyalty Program feature, allowing customers to earn and redeem points.
Accessing the Loyalty Dialog
- Select a customer in the cart
- The Loyalty button appears (or access via the customer section)
- Click to open the Loyalty Dialog
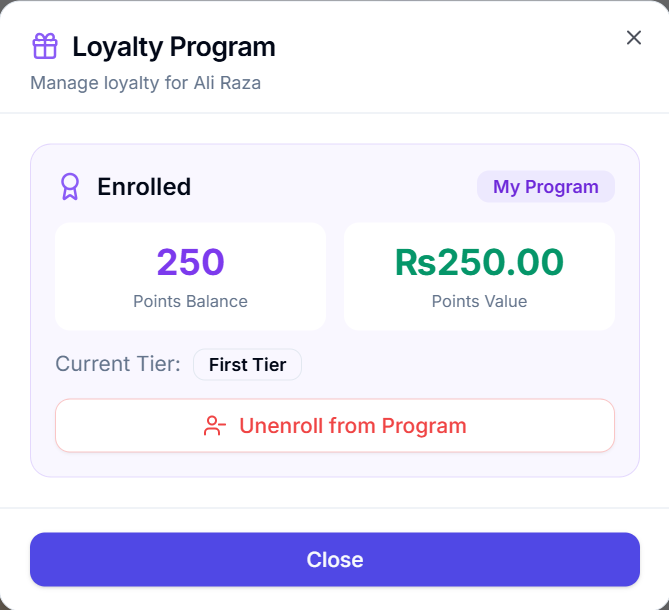
Loyalty Dialog — Enrolled Customer
If the customer is enrolled in a loyalty program, the dialog shows:
- Enrolled Badge — Green badge with the program name
- Points Balance — Large display of available loyalty points
- Points Value — Monetary equivalent of the points (based on conversion factor)
- Current Tier — The customer's loyalty tier (if tiered program)
- Unenroll Button — Red button to remove the customer from the program
Loyalty Dialog — Not Enrolled
If the customer is not enrolled:
- Empty State — Gift icon with "Not enrolled in any loyalty program" message
- Available Programs List — Buttons for each available loyalty program showing:
- Program name
- Conversion factor (e.g., "1 point = $0.01")
- Expiry duration
- Available tiers
- Enroll Button — Select a program and click "Enroll" to register the customer
Enrolling a Customer
- Open the Loyalty Dialog for the customer
- Select a loyalty program from the list
- Click "Enroll"
- The customer is registered in ERPNext's loyalty system
- They start earning points with their next purchase
Unenrolling a Customer
- Open the Loyalty Dialog for an enrolled customer
- Click the red "Unenroll" button
- Confirm the action
- The customer is removed from the loyalty program
- Accumulated points may be forfeited (depending on program settings)
Earning Points
Points are automatically awarded after invoice submission based on:
- The loyalty program's earning rules
- The purchase amount
- Any bonus points from POS Offers with "Loyalty Point" offer type
Redeeming Points
Points are redeemed during payment:
- Open the Payment Dialog (F4)
- The loyalty section shows available points and their value
- Click "Redeem Points"
- Enter the number of points to redeem
- The monetary value is calculated and deducted from the total
- Click "Apply"
See the Processing Payments page for detailed redemption steps.
Customer Discounts
If "Apply Customer Discount" is enabled in POS Profile:
- The system checks if the selected customer belongs to a customer group with a specific pricing rule
- Customer group discounts are automatically applied to applicable items
- This works alongside POS Offers and manual discounts
If "Force Price From Customer Price List" is enabled:
- The system overrides the standard selling price list with the customer's specific price list
- This is useful for wholesale customers or VIP pricing
Sales Person Assignment
X POS supports assigning a sales person to transactions:
- If Allowed Sales Persons are configured in the POS Profile, the sales person dropdown appears
- Select the sales person responsible for this transaction
- The sales person is stored with the invoice for commission tracking and reporting
- Sales persons are filtered based on the POS Profile's allowed list